
 RSS Feed
 In Canada, the month of December is pretty much guaranteed to see at least a few centimeters of snow. It is important to know the proper techniques for shoveling snow to prevent injuries.
1. Pick the Right Snow Shovel Replacing your old, beat-up shovel with an ergonomic one can make the chore of shoveling snow a lot easier.
2. Warm Up Thoroughly Tight muscles are more prone to injury than loose muscles. Warm your muscle for 5-10 minutes before hand by:
3. Use Proper Lifting Techniques Try to push the snow to one side rather than lifting it. When you must lift, make sure to use proper techniques.
4. Pace Yourself Shoveling small amounts of snow frequently is less strenuous than shoveling a large pile at once.
5. Keep Your Feet on the Ground
Read more at http://www.spine-health.com/wellness/ergonomics/snow-shoveling-techniques-prevent-low-back-injuries
23 Comments
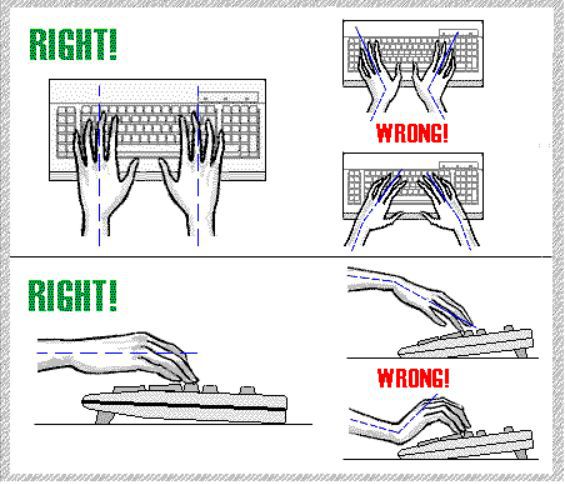 Repetitive Strain Injury (RSI) is a condition caused by prolonged repetitive hand movements, such as those involved in computer use. Symptoms include shooting pains in the hands, wrists, forearms, and back.
Here are 6 simple tips to prevent RSI and reduce the symptoms. 1. Type with wrists in the Neutral Position In Ergonomics, Neutral Wrist Position is defined as:
2. Adjust or replace your keyboard The correct keyboard adjustment is one where the keyboard is flat and at or below elbow level. This position makes it easiest to type with your wrists in the neutral position. A gel wrist rest placed along the edge of the desk can help prevent you from resting your wrists on the hard edge of the desk or table. However, you should never rest your wrists while typing even with gel rests. Only use this when you are no longer typing. 3. The mouse is often to blame Many people develop RSI in the hand they use the mouse with as they tend to rest their wrist and flex it upwards in the Dorsiflexion Position when it should be in neutral, as when you are typing. Using a mouse pad with a gel can promote elevation in the wrist while using the mouse. 4. Take regular breaks To prevent developing RSI, it is recommended to take a 5 minute break every 20 or 30 minutes of continuous desk activity, and more frequently if you have the condition. Set a reminder on your computer or mobile device and use this time to walk around and stretch your wrists. 5. Sit at the computer with good posture Bad posture while at a computer can lead to numerous aches and strains in your neck, back, and even wrists. Bad posture is a primary risk factor in RSI because leaning forward instead of sitting up straight leads to resting your wrists while using the keyboard and mouse. Choose and adjust your seat so that you sit up straight, rather than leaning forward over the keyboard. Refer to this article if you aren't sure what constitutes good posture. 6. Get treatment The final step to reducing symptoms of RSI is visiting a physiotherapist where you will benefit from a prognosis, hands on treatment, and a program to help reduce your symptoms when you're sitting alone in front of a computer. The key to less pain could be as simple as changing your habits.  Resting Heart Rate Before you determine your target heart rate during physical activity, it is important to know your resting heart rate. Your resting heart rate is the number of times your heart beats per minute while your body is relaxed. A good time for accurate result is first thing in the morning after a good sleep. Training Heart Rate Now, it’s time to determine you target training heart rate. Your aim is to stay between 50-69% of your maximum heart rate during moderately intense activities, and 70-90% during high intensity workouts. (see chart below). Step 1: Take your pulse from the inside of your wrist by gently pressing your index and middle fingers over the blood vessels. Step 2: Set a timer for 10 seconds and count your pulse, or watch the clock. Multiply this number by six to find your beats per minute. Step 3: Determine your heart rate zone based on the chart below. Your maximum heart rate is approximately 220, minus your age. 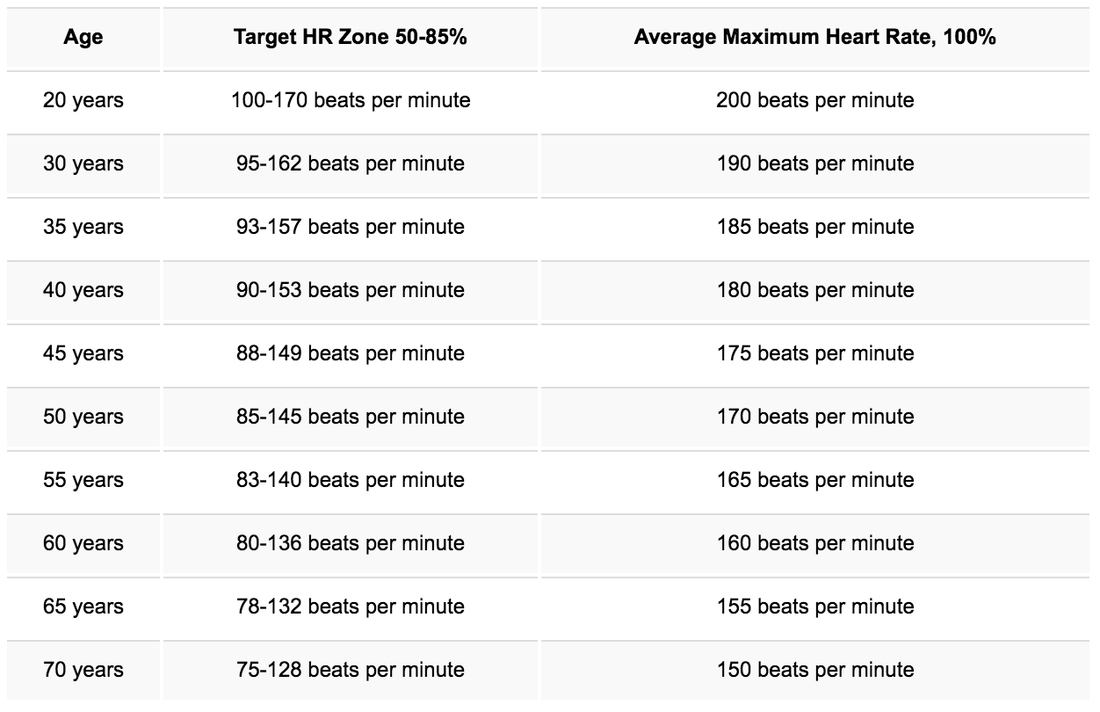 Now What?
If you find your heart rate is above your target zone of, slow down. Alternatively, if your heart rate is too slow, you know it’s time to kick up the intensity and push a little harder. By using the range of 50-69%, this method allows you to monitor your fitness level and understand whether the activity is appropriate, helping you to achieve whatever the results are that you’re aiming for. Try aiming for the lower range of your target heart rate zone and gradually make your way to a faster heart rate. Make sure you talk to your health care professional before beginning a new exercise regime and visit a physiotherapist for help creating a unique regime for you. 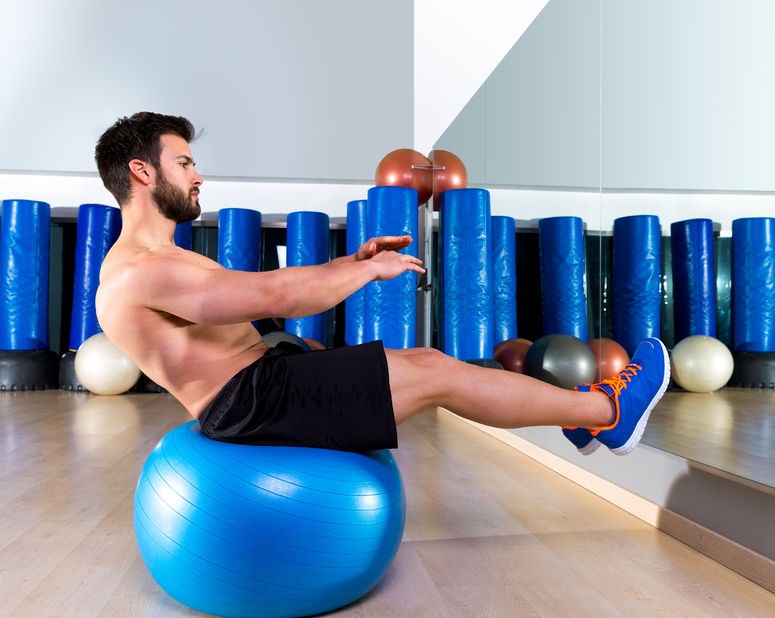 1. Help prevent injuries
Building a strong core is not a quick process. Strengthening your torso means building core stability as well as core strength. It is recommended that you begin with your stability, and work towards strength. Having your deeper muscles working first makes it easy for strong abdominal muscles to develop on top, making you less prone to injury down the road. A solid core will help ensure that your movements are strong and pain-free. 2. Protect your inner organs and central nervous system Staying healthy also means protecting those vital systems below the surface. Your core is where your organs and central nervous system do their work and is where your body’s largest veins and arteries are based. Keeping strong core muscles will help ensure everything stays protected as you move through your day. 3. Banish back pain Back pain is a common side effect of a weak core. Many of us make the mistake of sitting for long periods with a tilted pelvis and an arched back, rather than sitting tall. Building core strength will help bring balance to the front and back of your body and support your spine. 4. Build better posture Good posture is essential for combating chronic neck and back pain as it reduces the pressure on your spine. In addition to preventing pain, having a good posture exudes confidence and strength to help you be successful. You look taller, slimmer and more successful when you sit and stand tall. 5. Reduce belly fat Making changes in your diet is a good way to lose belly fat as well as doing core strengthening exercises which burns fat faster than cardio. Not only do you feel great with a more toned stomach, but the reduction of belly fat drastically increases your health and lowers your risk of diseases, including diabetes, heart disease and colon, kidney or digestive tract cancer. Always talk to your physiotherapist or doctor before starting a new exercise regime. Check out this slideshow on Mayo Clinic to learn abdominal exercises to help you build stability and strength in your core.  1. Stay hydrated
The discs between the vertebrae in your spine require water to maintain disc height and spinal alignment and to take pressure off the spine.
2. Increase magnesium intake Neck pain is most frequently the result of a muscle strain or sprain. Increasing your intake of magnesium, a mineral that aids in the contraction and relaxation of muscles, may help avoid these pain causing problems.
3. Avoid cradling the phone in your neck One way you may not even realize that you’re aggravating your neck is through angling it while speaking on the phone. Do not cradle the phone between your ear and shoulder, as this puts unneeded strain on your cervical spine. 4. Consider acupuncture Acupuncture stimulated nerves, muscles and connective tissue. This stimulation boosts your body's natural painkillers and increases blood flow, which is proven to help some people with pain management. 5. Try remedial massage Remedial massage differs from traditional massage in that it involves oil being applied and rubbed into the skin. Over time, the oil is intended to penetrate the muscles and joints, removing toxins and improving joint mobility while relaxing the muscles. A targeted remedial massage may offer relief for your neck pain. 6. Visit a physiotherapist It is common to think of physiotherapy as a treatment aimed at reducing symptoms from a given injury. In addition to this, physiotherapy for the neck can also have other benefits, such as:
7. Place ice on certain areas of the body Neck pain may also be joined by nagging headaches and numbness or tingling in the back of the head, neck, shoulders and hands. 8. Use a water pillow Water pillows allow you to dictate the firmness of the pillow to reach the ideal firmness that reduces neck pain while sleeping. More water equals a firmer pillow; less water provides a softer pillow. 9. Incorporate swimming into your exercise routine Swimming has therapeutic effects on neck pain, specifically in reducing inflammation, providing quick pain relief and easing neck stiffness. |
